OSB is the Standard – Oriented Strand Board
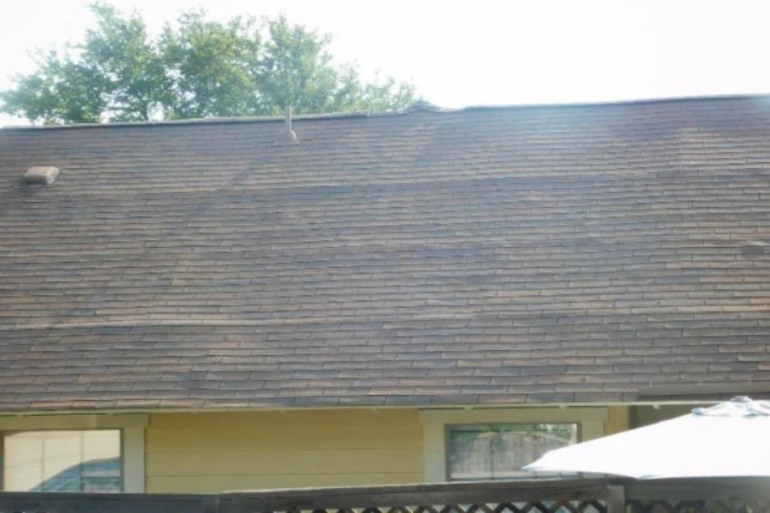
At certain times of the day, typically early morning, damaged OSB sheathing is apparent. Drive through any subdivision and you will see geometric shadows on every roof beneath the shingles where the 4×8, 7/16″ decking has swollen from exposure to moisture. Back in the day the standard was 1/2″ CDX plywood. (CD is the grade of plywood: C grade on the exposed side and D grade on the “down side.” The “X” indicates it is rated for exterior applications, though not ground or water contact. In lumber grading, the material finish rating is as high as “A” (finish quality) to as low as “D” (filler or shim materials.)
OSB is considered a superior product over plywood for a variety of reasons. The biggest selling point is that it is wax paraffin coated. This finish will repel casual water, making it more water resistant if exposed for an extended period.
The flaw in the protection from moisture occurs during the installation of the material. When workmen cut the OSB to length, or if the sheet is stored or shipped in a manner that scrapes the thin edges, it will expose the vulnerable chip board below the coating. If the material is left exposed and is rained upon with a significant downpour, water will breach the edge coating. The patterns you see in the roof reveals roof decking which has seen extended water exposure. The edges on all four sides of the sheets swell from water infiltration.
When applying roof decking to any project, it is critical that you “dry it in” as soon as possible. If your roofer is not available to install the roof, the decking crew must install a vapor barrier before rain has a chance to damage the material.
In the old days we used “felt” underlayment. Tar paper has been replaced with a new product called composite underlayment. It is significantly more expensive but provides better and longer lasting protection to the materials beneath the shingles.
Lay out Rafters as You Go – Strength and Beauty
Sometimes the OSB outlines are due to improper construction of the roof structure. The installation of roof decking requires is a bit more technical effort than most production frame/cornice subs are willing to invest in the process. I was told by a client that he preferred steel structures over wooden structures because the material is naturally straight. I replied, “God makes wood. We make it straight.” When installing decking panels, it is important that you “lay out” the rafters before you nail the decking in place. Most rafters, whether it be a cut roof or a prefabricated trussed roof, are laid out 24″ on center. Depending upon the span, a rafter can be as much as 6 inches off layout at center span. You don’t want to fasten your decking to a crooked rafter. Not only is it unsightly and weakens the structure, the rafter will be off layout when you install the next course of decking above it.
Note: Any layout interval greater than 16″ o.c. requires the installation of “H” clips in the space between rafters. The clips support the air space and maintains the 1/8″ gap required between the individual deck boards on all sides.
Decking staples are recommended over headed nails – even ring shank nails. The International Building Code calls for, and most manufacturers recommend the use of decking staples as the preferred means of fastening sheet decking on residential roof construction.
Remember: The proper tools and knowledge will help extend the life and use of any building project.
